Tuesday, August 31, 2010
Kitchen Counter Organizer Part 4
Measurements:
Inside Box
Long sides- cut 2- Chocolate Kiss- 8 5/8" X 5 1/8"
Short sides- cut 2- Chocolate Kiss- 5 1/8" X 4 1/2"
Bottom- cut 1- Chocolate Kiss- 8 5/8" X 4 1/2"
Outside Box
Long sides- cut 2- Chocolate Kiss- 8 3/4" X 5 1/4"
Short sides- cut 2- Chocolate Kiss- 5 1/4" X 4 3/4"
Bottom- cut 1- Chocolate Kiss- 8 3/4" X 4 3/4"
Outside Patterned Paper
Long sides- cut 2- Fruit Pattern- 8" X 3"
Short sides- cut 2- Fruit Pattern- 4" X 3"
Long sides- cut 2- Check Pattern- 8" X 2 1/2"
Short sides- cut 2- Check Pattern- 4" X 2 1/2"
Top Kraft pieces that fold over
Long sides- cut 2- 8 5/8" X 4"- scored at 2"
Short sides- cut 2- 5 1/8" X 4"- scored at 2"
Folders
Kraft- cut 3- 8 1/2" X 10 1/2"- scored at 5 1/2", folded, then cut an additional 1/4" off the longer edge
Chocolate inside- cut 3- 8 1/4" X 5"
Patterned paper for outside- cut 3- 8" X 4 1/2"
Additional- Chocolate and Kraft for oval and tabs. Patterned paper if you want to paper piece the decorative medallion.
Decorative Greeting Card Holder Part 3
Measurements:
Kleenex Brand Square Box
Cranberry Tart Pieces:
4 Inside walls- 5" X 4.25"
2 bottom pieces, (inside and outside)- 4.25" X 4.25"
1 outside piece- 5" X 11", scored at 1", 5.5", 10"
1 outside piece- 5" X 9", scored at 4.5", then trimm 1/4 inch off each end
Patterned Paper Pieces:
5 Outside peices, (4 walls and bottom)- 4" X 4"
4 fold over flaps- 4.25" X 4", scored at 2" and folded in half
Thursday, August 26, 2010
Word Art Within Cricut Shapes
Have you ever wanted to put text within a shape on your projects? Well, today I am going to show you how to do it using a Cricut image as shown in my card!
To do this with a Cricut image you will need:
Paint
Inkscape
Open Design Studio and select the image you want to work with. Make sure you have the proper size already designed. Once you have the image, go to 100% view and then click preview so that it will show in color:
Take a screen print of this image (Alt+Prt Sc or Fn+Prt Sc)
Open Paint and choose paste then crop around the shape and choose copy:
Open Inkscape and paste image.
Select the image and from the Path menu, choose Trace Bitmap. Choose to trace by Color and take the Scan down to 2. Make sure to remove the background as well.
Click update and then okay then close the trace box. Separate the two images and remove the original.
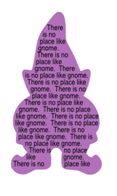
Next, choose the text option and type your text, grabbing the font and size that you would like. If you are repeating your text, you will need to type the text over several times. In this example I am using the sentence “There is no place like gnome.”.
Once you have your text typed, go back to your Select and Transform arrow (F1) and select your text box and then while holding the shift key, select your shape.
Go to the Text menu and choose Flow into Frame.
If you aren’t happy with the text, click undo (Ctrl+Z) and edit your text (center/change font/add more, etc). Once you have modified, select both the shape and text again and use the Flow into Frame option again.
Once you have the text as you would like it, you can change or remove the image color. Select the image (in my example, I am currently a purple shade) and then choose a color from the color bar. You can also change the color of your text by selecting the text and then choosing a color from the color bar.
Here I have change my image to white and my text to brown.
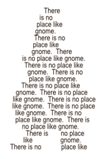
You can select both items again and move them around on the page, and then print!
Blogged by Jamie Lane at Thursday, August 26, 2010
Sunday, August 22, 2010
Photo Frame Card-mailable
For my project, I used the Freshly Picked Cricut Cartridge to make this 'mailable' frame! To make the frame: With Frame option on, choose the Pumpkin key and adjust size to 6", cut the frame in brown cardstock. Cut a piece of orange cardstock to 6 1/2" x 6". Attach to the back of the brown frame, leaving the right side around the frame open. To cut the pumpkin, use the Layers option at 2 3/4" cut once in orange and then again with the Shift Layers option on in green  (for the leaf). The wording is cut with the Word option on at 1" cut once in orange and then again with the Shift Word option on in a lighter brown. Using the same color as the back of the frame, cut a piece of cardstock to 5 1/4" x 2 3/4". Score at 1/2", 1 1/2", 2 1/2", and 4 1/4". Place adhesive on the two 1/2" ends and attach to frame (as shown). Using circle punch, punch a half circle where the photo will slide in and out. Round top two corners of frame with a 1/2" corner punch. Use Fruit Punch and Lime Green Stickles to decorate the pumpkin and wording and attach to the front of the frame as shown in the photo. Add in stitching with the white gel pen and embellish with ribbon and a button!
 (for the leaf). The wording is cut with the Word option on at 1" cut once in orange and then again with the Shift Word option on in a lighter brown. Using the same color as the back of the frame, cut a piece of cardstock to 5 1/4" x 2 3/4". Score at 1/2", 1 1/2", 2 1/2", and 4 1/4". Place adhesive on the two 1/2" ends and attach to frame (as shown). Using circle punch, punch a half circle where the photo will slide in and out. Round top two corners of frame with a 1/2" corner punch. Use Fruit Punch and Lime Green Stickles to decorate the pumpkin and wording and attach to the front of the frame as shown in the photo. Add in stitching with the white gel pen and embellish with ribbon and a button!
Thursday, August 19, 2010
Tuesday, August 17, 2010
Monday, August 16, 2010
The cut dimensions of the ABC rectangle (the card base) are 4.5 x 9". Finished, the card is 4.5" square. D becomes the easel for other cuts. To cut: use a 12" square piece of card stock. When cut, fold using arrows as guides. Attach D to C, extending above the fold between B-C. I reccommend that you make a sample and play first!
Canvas Painting
Paint the canvasses. Cut two pieces of dessinpaper 20 cm x 20 cm. Put one of them on chipboard. Cut holes in the middle. Cut a hole in one of the canvasses and put transparent sheet behind it. Paste the chipboard house to the canvas using double adhesive tape. Put the onther one on the back of the canvas. Cut a roof with chipboard and paste dessinpaper to the front and back. Put it on the canvas. Cut a piece of paper 20 cm x 10 cm. Score it at 3cm, 5 cm and 7 cm. This is the hinge that will go between the two canvasses. Use tacky tape to tape it to the two canvasses. Cut cardstock 20 cm x 28 cm and fold it in half. Use a circle punch and punch half a hole. Use tacky tape to tape it to the fold in the middle to creat an envelop. Put a tag in it 18,5 cm x 10 cm. Cut strips of paper 2 cm. Use them to cover op the sides of the canvas. Now you can embellish it with lace, sizzix dies, leaves, flowers, quotes and patterned paper. Just add photo's and you are done.
Sunday, August 15, 2010
Friday, August 6, 2010
Frustrating day
This has been a frustrating day with trying to create a Tri-fold card using Inkscape.... no one writes their instructions down.... they do a video and than you have to play over and over again and than miss some important instruction; or the instructor half gives information (not intentional, I'm sure). I would like to see that they give written as well as video... for me it holds longer to read it.
I did get my order out today... sent all the way to Arizona. Now I am working on the three dolls for the Art in the Park event coming up, plus the quilts need to be finished. Feeling the pressure right now.
It's going to rain ... whoooooohoooooooooo. Won't cool it off around here though.
Anyhow to the cutting table. TTYL
Wednesday, August 4, 2010
Tuesday, August 3, 2010
Cutting Mats in MTC
1. Open a .jpg (.png, or .bmp should work, too) file in the program of your choice (I used PSE) and print it, being careful to select settings that will result in a 100% print size (uncheck shrink to fit, etc.). This image is from an ancient PC Crafter ClipArt CD.
2. Import the same .jpg file that you used in step 1 into MTC (if you made changes to the file before printing, be sure to save it before importing) or for a preprinted image scan directly into MTC. Adjust threshold until you see a solid outline (the internal details don’t matter) and click “Import” to trace.
3. In MTC, with the image still selected, click Break followed by Weld to create a solid outline (also called blackout).
4. In MTC, create a shadow layer at the desired size and turn off the original outline so that only the shadow layer will cut (click the corresponding eye icon in the layers palette).
5. Use the hinge technique to position the printout on the mat for cutting, and cut.
If you are not familiar with the hinge technique you can look at steps 12-15 on this page. I also have a video here. (Of course, if you are using MTC you can ignore the part in the video about the coordinates since MTC will cut your outline in exactly the same location on 2 successive cuts automatically.)
A beautifully cut out printed image is achieved without noting or entering a single measurement! Can you tell I am psyched?
Note: MTC does a pretty good job of correlating the virtual mat to your actual mat when cutting, so if your file is forgiving (can tolerate ±1/16in.), you may prefer to simply position it on the mat using the guidelines (image aligned with same guidelines on both virtual and real mat, for instance) as opposed to using the hinge method. Keep in mind that the Cricut’s “creep” will come into play with larger images and wreak havoc on your efforts to print and cut page size images.
Another note: This procedure works great for making mats for your rubber stamps, too. Instead of step 1, stamp the image cleanly on a white piece of paper (or use the image from the back of the stamp). For step 2, scan the image into MTC and continue with the rest of step 2, step 3 and step 4. Then duplicate the mat shape as many times you like and cut out of blank card stock. Now you have custom cutout shapes to stamp on.
Subscribe to:
Comments (Atom)
Operation Write Home
Love someone with Autism

Alexis - age 6

Kassidy - age 3 (Ornery)

Constance (Connie) 18


